3. Heidi: our first Inform game
E was an esquire, with pride on his brow;F was a farmer, and followed the plough.

ach of the three games in this guide is created step by step; you’ll get most benefit (especially to begin with) if you take an active part, typing in the source code on your computer. Our first game, described in this chapter and the two which follow, tells this sentimental little story:
“Heidi lives in a tiny cottage deep in the forest. One sunny day, standing before the cottage, she hears the frenzied tweeting of baby bird; its nest has fallen from the tall tree in the clearing! Heidi puts the bird into the nest, and then climbs the tree to place the nest back on its branch.”
It’s a very simple tale, but even so we’ll cover quite a lot of ground before we have a finished Inform game. We’ll get there in stages, first making a very rough approximation of the story, and then successively refining the details until it’s good enough for an initial attempt (there’s time later for more advanced stuff).
Creating a basic source file
The first task is to create an Inform source file template. Every game that we design will start out like this. Follow these steps:
Create an
Inform\Games\Heidifolder (maybe by copyingInform\Games\MyGame1).Note
In this guide, we use the PC convention of placing a backslash between folder names. On a Macintosh, use a regular slash:
Inform/Games/Heidi.In that folder, use your text editor to create this source file
Heidi.inf:--- T Y P E ---!% -SD !============================================================================ Constant Story "Heidi"; Constant Headline "^A simple Inform example ^by Roger Firth and Sonja Kesserich.^"; Include "Parser"; Include "VerbLib"; !============================================================================ ! The game objects !============================================================================ ! Entry point routines [ Initialise; ]; !============================================================================ ! Standard and extended grammar Include "Grammar"; !============================================================================
Soon, we’ll explain what this means. For now, just type it all in, paying particular attention to those seven semicolons, and ensuring that the double quotes ”...” always come in pairs. The first line beginning with “
!%” is special, and we’ll talk about it in a moment; the remaining exclamation mark lines, on the other hand, are purely decorative; they just make the file’s structure a little easier to understand.Ensure the file is named
Heidi.inf, rather thanHeidi.txtorHeidi.inf.txt.Remember that, throughout this guide, we place the “
TYPE” symbol alongside pieces of code that we recommend you to type into your own game files as you read through the examples (which, conversely, means that you don’t need to type the unmarked pieces of code). You’ll learn Inform more quickly by trying it for yourself, rather than just taking our word for how things work.In the same folder, use your text editor to create the compilation support file
Heidi.bat(on a PC):--- T Y P E ---..\..\Lib\Base\Inform Heidi +include_path=.\,..\..\Lib\Base,..\..\Lib\Contrib | more pause "at end of compilation"or
Heidi.command(on a Macintosh):--- T Y P E ---cd ~/Inform/Games/Heidi/ ../../Lib/Base/inform30_macosx Heidi +include_path=./,../../Lib/Base,../../Lib/ContribRemember that there’s just one space between “
Heidi” and “+include_path”.Type in the file from scratch, or copy and edit
MyGame1.bat(orMyGame1.command). At this point, you should have aHeidifolder containing two files:Heidi.infand eitherHeidi.batorHeidi.command.Compile the source file
Heidi.inf; refer back to Inform on an IBM PC (running Microsoft Windows) or Inform on an Apple Macintosh (running OS X) for guidance. If the compilation works, a story fileHeidi.z5appears in the folder. If the compilation doesn’t work, you’ve probably made a typing mistake; check everything until you find it.You can run the story file in your Inform interpreter; you should see this (except that the Serial number will be different – it’s based on the date):
Heidi
A simple Inform example
by Roger Firth and Sonja Kesserich.
Release 1 / Serial number 040804 / Inform v6.30 Library 6/11 SD

Darkness
It is pitch dark, and you can't see a thing.

>
When you get that far, your template source file is correct. Let’s explain what it contains.
Understanding the source file
Although we’ve got a certain amount of freedom of expression, source files tend to conform to a standard overall structure: these lines at the start, that material next, those pieces coming at the end, and so on. What we’re doing here is mapping out a structure that suits us, giving ourselves a clear framework onto which the elements of the game can be fitted. Having a clear (albeit sparse) map at the start will help us to keep things organised as the game evolves. We can infer several Inform rules just by looking at the source file.
If the very first line (or lines) of the source file begin with the characters “
!%”, then the compiler treats what follows on those lines as control instructions to itself rather than as part of the game’s source. The instructions most commonly placed here are compiler switches, a way of controlling detailed aspects of how the compiler operates. These particular switches, two of many, are turning on Strict mode, which makes the game less likely to misbehave when being played, and Debug mode, which provides some extra commands which can be helpful when tracking down problems.Otherwise, when the compiler comes across an exclamation mark, it ignores the rest of the line. If the
!is at the start of a line, the whole line is ignored; if the!is halfway along a line, the compiler takes note of the first half, and then ignores the exclamation mark and everything after it on that line. We call material following an exclamation mark, not seen by anybody else, a comment; it’s often a remark that we write to remind ourselves of how something works or why we tackled a problem in a particular way. There’s nothing special about those equals signs: they just produce clear lines across the page.It’s always a good idea to comment code as you write it, for later it will help you to understand what was going on at a particular spot. Although it all seems clear in your head when you first write it, in a few months you may suspect that a totally alien mind must have produced that senseless gibberish.
By the way, the compiler doesn’t give special treatment to exclamation marks in quoted text:
!within quotes ”...” is treated as a normal character. On this line, the first!is part of the sequence (or string) of characters to be displayed:print "Hello world!"; ! <- is the start of this comment
The compiler ignores blank lines, and treats lots of space like a single space (except when the spaces are part of a character string). So, these two rules tell us that we could have typed the source file like this:
Constant Story "Heidi";
Constant Headline
"^A simple Inform example^by Roger Firth and Sonja Kesserich.^";
Include "Parser";Include "VerbLib";
[ Initialise; ];
Include "Grammar";
We didn’t type it that way because, though shorter, it’s much harder to read. When designing a game, you’ll spend a lot of time studying what you’ve typed, so it’s worthwhile taking a bit of care to make it as readable as possible.
Every game should have the constant definitions for
Story(the game’s name) andHeadline(typically, information on the game’s theme, copyright, authorship and so on). These two string values, along with a release number and date, and details of the compiler, compose the banner which is displayed at the start of each game.Every game needs the three lines which
Includethe standard library files – that is, they merge those files’ contents into your source file:Include "Parser"; Include "VerbLib"; ... Include "Grammar";
They always have to be in this order, with
ParserandVerbLibnear the start of the file, andGrammarnear the end.Every game needs to define an
Initialiseroutine (note the British spelling):[ Initialise; ];
The routine that we’ve defined here doesn’t do anything useful, but it still needs to be present. Later, we’ll come back to
Initialiseand explain what a routine is and why we need this one.You’ll notice that each of the items mentioned in the previous three rules ends with a semicolon. Inform is very fussy about its punctuation, and gets really upset if you forget a terminating semicolon. In fact, the compiler just keeps reading your source file until it finds one; that’s why we were able to take three lines to define the
HeadlineconstantConstant Headline "^A simple Inform example ^by Roger Firth and Sonja Kesserich.^";
Just to repeat what we said earlier: every game that you design will start out from a basic source file like this (in fact, it might be sensible to keep a copy of this template file in a safe place, as a starting point for future games). Think of this stuff as the basic preparation which you’ll quickly come to take for granted, much as a landscape artist always begins by sizing the canvas before starting to paint. So, now that we’ve taken a quick tour of Inform’s general needs, we can start thinking about what this particular game requires.
Defining the game’s locations
A good starting point in any game is to think about the locations which are involved: this sketch map shows the four that we’ll use:
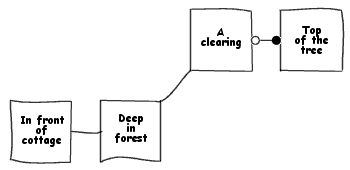
In IF, we talk about each of these locations as a room, even though in this example none of them has four walls. So let’s use Inform to define those rooms. Here’s a first attempt:
Object "In front of a cottage"
with description
"You stand outside a cottage. The forest stretches east.",
has light;
Object "Deep in the forest"
with description
"Through the dense foliage, you glimpse a building to the west.
A track heads to the northeast.",
has light;
Object "A forest clearing"
with description
"A tall sycamore stands in the middle of this clearing.
The path winds southwest through the trees.",
has light;
Object "At the top of the tree"
with description "You cling precariously to the trunk.",
has light;
Again, we can infer some general principles from these four examples:
A room definition starts with the word
Objectand ends, about four lines later, with a semicolon. Each of the components that appears in your game – not only the rooms, but also the people, the things that you see and touch, intangibles like a sound, a smell, a gust of wind – is defined in this way; think of an “object” simply as the general term for the myriad thingies which together comprise the model world which your game inhabits.The phrase in double quotes following the word
Objectis the name that the interpreter uses to provide the player character with a list of the objects around her: where she is, what she can see, what she’s holding, and so on.Note
We’re using the word “player” to mean both the person who is playing the game, and the principal protagonist (often known as the player character) within the game itself. Since the latter – Heidi – is female, we’ll refer to the player as “she” while discussing this game.
A keyword
withfollows, which simply tells the compiler what to expect next.
- The word
description, introducing another piece of text which gives more detail about the object: in the case of a room, it’s the appearance of the surrounding environment when the player character is in that room. The textual description is given in double quotes, and is followed by a comma. - Near the end, the keyword
hasappears, which again tells the compiler to expect a certain kind of information.
- The word
lightsays that this object is a source of illumination, and that therefore the player character can see what’s happening here. There has to be at least one light source in every room (unless you want the player to be told that “It’s pitch dark and you can’t see a thing”); most commonly, that light source is the room itself.
A smidgeon of background may help set this into context (there’s more in
the next chapter). An object can have both properties (introduced
by the keyword with) and attributes (written after the word
has). A property has both a name (like description) and a
value (like the character string “You stand outside a cottage. The
forest stretches east.”); an attribute has merely a name.
In a little while, when you play this game, you’ll observe that it starts like this:
In front of a cottage
You stand outside a cottage. The forest stretches east.
And here you can see how the room’s name (In front of a cottage) and
description (You stand outside a cottage. The forest stretches east.)
are used.
Joining up the rooms
We said that this was a first attempt at defining the rooms; it’s fine as far as it goes, but a few bits of information are missing. If you look at the game’s sketch map, you can see how the rooms are intended to be connected; from “Deep in the forest”, for example, the player character should be able to move west towards the cottage, or northeast to the clearing. Now, although our descriptions mention or imply these available routes, we also need to explicitly add them to the room definitions in a form that the game itself can make sense of. Like this:
Object before_cottage "In front of a cottage"
with description
"You stand outside a cottage. The forest stretches east.",
e_to forest,
has light;
Object forest "Deep in the forest"
with description
"Through the dense foliage, you glimpse a building to the west.
A track heads to the northeast.",
w_to before_cottage,
ne_to clearing,
has light;
Object clearing "A forest clearing"
with description
"A tall sycamore stands in the middle of this clearing.
The path winds southwest through the trees.",
sw_to forest,
u_to top_of_tree,
has light;
Object top_of_tree "At the top of the tree"
with description "You cling precariously to the trunk.",
d_to clearing,
has light;
We’ve made two changes to the room objects.
First, between the word
Objectand the object’s name in double quotes, we’ve inserted a different type of name: a private, internal identification, never seen by the player; one that we can use within the source file when one object needs to refer to another object. For example, the first room is identified asbefore_cottage, and the second asforest.Unlike the external name contained in double quotes, the internal identifier has to be a single word – that is, without spaces. To aid readability, we often use an underscore character to act as sort of pseudo-space:
before_cottageis a bit clearer thanbeforecottage.Second, we’ve added lines after the object descriptions which use those internal identifiers to show how the rooms are connected; one line for each connection. The
before_cottageobject has this additional line:e_to forest,
This means that a player standing in front of the cottage can type GO EAST (or EAST, or just E), and the game will transport her to the room whose internal identification is
forest. If she tries to move in any other direction from this room, she’ll be told “You can’t go that way”.What we’ve just defined is a one-way easterly connection:
before_cottage→forest. The forest object has two additional lines:w_to before_cottage, ne_to clearing,
The first line defines a westerly connection
forest→before_cottage(thus enabling the player character to return to the cottage), and the second defines a connectionforest→clearingwhich heads off to the northeast.Inform provides for eight “horizontal” connections (
n_to,ne_to,e_to,se_to,s_to,sw_to,w_to,nw_to) two “vertical” ones (u_to,d_to) and two specialsin_to, andout_to. You’ll see some of these used for the remaining inter-room connections.
There’s one last detail to attend to before we can test what we’ve done.
You’ll recollect that our story begins with Heidi standing in front of her
cottage. We need to tell the interpreter that before_cottage is the
room where the game starts, and we do this in the Initialise routine:
[ Initialise; location = before_cottage; ];
location is a variable, part of the library, which tells the
interpreter in which room the player character currently is. Here, we’re
saying that, at the start of the game, the player character is in the
before_cottage room.
Now we can add what we’ve done to the Heidi.inf source file template.
At this stage, you should study the four room definitions, comparing them
with the sketch map until you’re comfortable that you understand how to
create simple rooms and define the connections between them.
--- T Y P E ---
!============================================================================
Constant Story "Heidi";
Constant Headline
      "^A simple Inform example
       ^by Roger Firth and Sonja Kesserich.^";
Include "Parser";
Include "VerbLib";
!============================================================================
! The game objects
Object   before_cottage "In front of a cottage"
  with   description
             "You stand outside a cottage. The forest stretches east.",
         e_to forest,
  has    light;

Object   forest "Deep in the forest"
  with   description
             "Through the dense foliage, you glimpse a building to the west.
              A track heads to the northeast.",
         w_to before_cottage,
         ne_to clearing,
  has    light;

Object   clearing "A forest clearing"
  with   description
             "A tall sycamore stands in the middle of this clearing.
              The path winds southwest through the trees.",
         sw_to forest,
         u_to top_of_tree,
  has    light;

Object   top_of_tree "At the top of the tree"
  with   description "You cling precariously to the trunk.",
         d_to clearing,
  has    light;
!============================================================================
! Entry point routines
[ Initialise; location = before_cottage; ];
!============================================================================
! Standard and extended grammar
Include "Grammar";
!============================================================================
Type this in, as always taking great care with the punctuation – watch those commas and semicolons. Compile it, and fix any mistakes which the compiler reports. You can then play the game in its current state. Admittedly, you can’t do very much, but you should be able to move freely among the four rooms that you’ve defined.
Note
In order to minimise the amount of typing that you have to do, the descriptive text in this game has been kept as short as possible. In a real game, you would typically provide more interesting descriptions than these.
Adding the bird and the nest
Given what we said earlier, you won’t be surprised to hear that both the bird and its nest are Inform objects. We’ll start their definitions like this:
Object bird "baby bird"
with description "Too young to fly, the nestling tweets helplessly.",
has ;
Object nest "bird's nest"
with description "The nest is carefully woven of twigs and moss.",
has ;
You can see that these definitions have exactly the same format as the
rooms we defined previously: a one-word internal identifier (bird,
nest), and a word or phrase naming the object for the player’s benefit
(baby bird, bird's nest). They both have some descriptive detail:
for a room this is printed when the player first enters, or when she types
LOOK; for other objects it’s printed when she EXAMINEs that object. What
they don’t have are connections (e_to, w_to, etc. apply
only to rooms) or light (it’s not necessary – the rooms ensure
that light is available).
When the game is running, the player will want to refer to these two objects, saying for instance EXAMINE THE BABY BIRD or PICK UP THE NEST. For this to work reliably, we need to specify the word (or words) which relate to each object. Our aim here is flexibility: providing a choice of relevant vocabulary so that the player can use whatever term seems appropriate to her, with a good chance of it being understood. We add a line to each definition:
--- T Y P E ---
Object bird "baby bird"
with description "Too young to fly, the nestling tweets helplessly.",
name 'baby' 'bird' 'nestling',
has ;
Object nest "bird's nest"
with description "The nest is carefully woven of twigs and moss.",
name 'bird^s' 'nest' 'twigs' 'moss',
has ;
The name introduces a list in single quotes ‘...’. We call each of
those quoted things a dictionary word, and we do mean “word”, not
“phrase” ('baby''bird' rather than 'baby bird'); you can’t
uses spaces, commas or periods in dictionary words, though there’s a
space between each one, and the whole list ends with a comma. The idea
is that the interpreter decides which object a player is talking about by
matching what she types against the full set of all dictionary words. If
the player mentions BIRD, or BABY BIRD, or NESTLING, it’s the baby bird
that she means; if she mentions NEST, BIRD’S NEST or MOSS, it’s the
bird's nest. And if she types NEST BABY or BIRD TWIGS, the interpreter
will politely say that it doesn’t understand what on earth she’s talking
about.
Note
You’ll notice the use of 'bird^s' to define the dictionary word
BIRD’S; this oddity is necessary because the compiler expects the single
quotes in the list always to come in pairs – one at the start of the
dictionary word, and one at the end. If we had typed 'bird's' then
the compiler would find the opening quote, the four letters b,
i, r and d, and what looks like the closing quote. So far
so good; it’s read the word BIRD and now expects a space before the next
opening quote... but instead finds s' which makes no sense. In
cases like this we must use the circumflex ^ to represent the
apostrophe, and the compiler then treats bird's as a dictionary
word.
You may be wondering why we need a list of name words for the bird
and its nest, yet we didn’t when we defined the rooms? It’s because the
player can’t interact with a room in the same way as with other objects;
for example, she doesn’t need to say EXAMINE THE FOREST – just being there
and typing LOOK is sufficient.
The bird’s definition is complete, but there’s an additional complexity
with the nest: we need to be able to put the bird into it. We do this by
labelling the nest as a container – able to hold other objects –
so that the player can type PUT (or INSERT) BIRD IN (or INTO) NEST.
Furthermore, we label it as open; this prevents the interpreter
from asking us to open it before putting in the bird.
Object nest "bird's nest"
with description "The nest is carefully woven of twigs and moss.",
name 'bird^s' 'nest' 'twigs' 'moss',
has container open;
Both objects are now defined, and we can incorporate them into the game. To do this, we need to choose the locations where the player will find them. Let’s say that the bird is found in the forest, while the nest is in the clearing. This is how we set this up:
Object bird "baby bird" forest
with description "Too young to fly, the nestling tweets helplessly.",
name 'baby' 'bird' 'nestling',
has ;
Object nest "bird's nest" clearing
with description "The nest is carefully woven of twigs and moss.",
name 'bird^s' 'nest' 'twigs' 'moss',
has container open;
Read that first line as: “Here’s the definition of an object which is
identified within this file as bird, which is known to the player as
baby bird, and which is initially located inside the object identified
within this file as forest.”
Where in the source file do these new objects fit? Well, anywhere really, but you’ll find it convenient to insert them following the rooms where they’re found. This means adding the bird just after the forest, and the nest just after the clearing. Here’s the middle piece of the source file:
!============================================================================
! The game objects
Object before_cottage "In front of a cottage"
with description
"You stand outside a cottage. The forest stretches east.",
e_to forest,
has light;
Object forest "Deep in the forest"
with description
"Through the dense foliage, you glimpse a building to the west.
A track heads to the northeast.",
w_to before_cottage,
ne_to clearing,
has light;
Object bird "baby bird" forest
with description "Too young to fly, the nestling tweets helplessly.",
name 'baby' 'bird' 'nestling',
has ;
Object clearing "A forest clearing"
with description
"A tall sycamore stands in the middle of this clearing.
The path winds southwest through the trees.",
sw_to forest,
u_to top_of_tree,
has light;
Object nest "bird's nest" clearing
with description "The nest is carefully woven of twigs and moss.",
name 'bird^s' 'nest' 'twigs' 'moss',
has container open;
Object top_of_tree "At the top of the tree"
with description "You cling precariously to the trunk.",
d_to clearing,
has light;
!============================================================================
Make those changes, recompile the game, play it and you’ll see this:
Deep in the forest
Through the dense foliage, you glimpse a building to the west. A track heads
to the northeast.

You can see a baby bird here.

>
Adding the tree and the branch
The description of the clearing mentions a tall sycamore tree, up which the player character supposedly “climbs”. We’d better define it:
--- T Y P E ---
Object   tree "tall sycamore tree" clearing
  with   description
             "Standing proud in the middle of the clearing,
              the stout tree looks easy to climb.",
         name 'tall' 'sycamore' 'tree' 'stout' 'proud',
  has    scenery;
Everything there should be familiar, apart from that scenery at the
end. We’ve already mentioned the tree in the description of the forest
clearing, so we don’t want the interpreter adding “You can see a tall
sycamore tree here” afterwards, as it does for the bird and the nest. By
labelling the tree as scenery we suppress that, and also prevent it
from being picked up by the player character. One final object: the branch
at the top of the tree. Again, not many surprises in this definition:
--- T Y P E ---
Object   branch "wide firm bough" top_of_tree
  with   description "It's flat enough to support a small object.",
         name 'wide' 'firm' 'flat' 'bough' 'branch',
  has    static supporter;
The only new things are those two labels. static is similar to
scenery: it prevents the branch from being picked up by the player
character, but doesn’t suppress mention of it when describing the
setting. And supporter is rather like the container that
we used for the nest, except that this time the player character can put
other objects onto the branch. (In passing, we’ll mention that an object
can’t normally be both a container and a supporter.) And
so here are our objects again:
!============================================================================
! The game objects

Object   before_cottage "In front of a cottage"
  with   description
             "You stand outside a cottage. The forest stretches east.",
         e_to forest,
  has    light;

Object   forest "Deep in the forest"
  with   description
             "Through the dense foliage, you glimpse a building to the west.
              A track heads to the northeast.",
         w_to before_cottage,
         ne_to clearing,
  has    light;

Object   bird "baby bird" forest
  with   description "Too young to fly, the nestling tweets helplessly.",
         name 'baby' 'bird' 'nestling',
  has    ;

Object   clearing "A forest clearing"
  with   description
             "A tall sycamore stands in the middle of this clearing.
              The path winds southwest through the trees.",
         sw_to forest,
         u_to top_of_tree,
  has    light;

Object   nest "bird's nest" clearing
  with   description "The nest is carefully woven of twigs and moss.",
         name 'bird^s' 'nest' 'twigs' 'moss',
   has   container open;

Object   tree "tall sycamore tree" clearing
  with   description
             "Standing proud in the middle of the clearing,
              the stout tree looks easy to climb.",
         name 'tall' 'sycamore' 'tree' 'stout' 'proud',
   has   scenery;

Object   top_of_tree "At the top of the tree"
  with   description "You cling precariously to the trunk.",
         d_to clearing,
   has   light;

Object   branch "wide firm bough" top_of_tree
  with   description "It's flat enough to support a small object.",
         name 'wide' 'firm' 'flat' 'bough' 'branch',
   has   static supporter;

!============================================================================
Once again, make the changes, recompile, and investigate what you can do in your model world.
Finishing touches
Our first pass at the game is nearly done; just two more changes to describe. The first is easy: Heidi wouldn’t be able to climb the tree carrying the bird and the nest separately: we want the player character to put the bird into the nest first. One easy way to enforce this is by adding a line near the top of the file:
--- T Y P E ---
!============================================================================
Constant Story "Heidi";
Constant Headline
            "^A simple Inform example
             ^by Roger Firth and Sonja Kesserich.^";

Constant MAX_CARRIED 1;
The value of MAX_CARRIED limits the number of objects that the player
character can be holding at any one time; by setting it to 1, we’re saying
that she can carry the bird or the nest, but not both. However, the limit
ignores the contents of container or supporter objects, so
the nest with the bird inside it is still counted as one object.
The other change is slightly more complex and more important: there’s currently no way to “win” the game! The goal is for the player character to put the bird in the nest, take the nest to the top of the tree, and place it on the branch; when that happens, the game should be over. This is one way of making it happen:
--- T Y P E ---
Object  branch "wide firm bough" top_of_tree
  with  description "It's flat enough to support a small object.",
        name 'wide' 'firm' 'flat' 'bough' 'branch',
        each_turn [; if (nest in branch) deadflag = 2; ],
   has  static supporter;
Note
Here’s an explanation of what’s going on. If you find this difficult to grasp, don’t worry. It’s the hardest bit so far, and it introduces several new concepts all at once. Later in the guide, we’ll explain those concepts more clearly, so you can just skip this bit if you want.
The variable deadflag, part of the library, is normally 0. If
you set its value to 2, the interpreter notices and ends the game with
“You have won”. The statement:
if (nest in branch) deadflag = 2;
should be read as: “Test whether the nest is currently in the
branch (if the branch is a container) or on it (if the
branch is a supporter); if it is, set the value of deadflag
to 2; if it isn’t, do nothing.” The surrounding part:
each_turn [; ... ],
should be read as: “At the end of each turn (when the player is in the same room as the branch), do whatever is written inside the square brackets”. So, putting that all together:
- At the end of each turn (after the player has typed something and
pressed the Enter key, and the interpreter has done whatever was
requested) the interpreter checks whether the player and the
branchare in the same room. If not, nothing happens. If they’re together, it looks to see where the nest is. Initially it’s in theclearing, so nothing happens. - Also at the end of each turn, the interpreter checks the value of
deadflag. Usually it’s 0, so nothing happens. - Finally the player character puts the
neston thebranch. “Aha!” says the interpreter (to itself, of course), and sets the value ofdeadflagto 2. - Immediately afterwards, (another part of) the interpreter checks and
finds that the value of
deadflaghas changed to 2, which means that the game is successfully completed; so, it says to the player, “you’ve won!”
That’s as far as we’ll take this example for now. Make those final changes, recompile, and test what you’ve achieved. You’ll probably find a few things that could be done better – even on a simple game like this there’s considerable scope for improvement – so we’ll revisit Heidi in her forest shortly. First, though, we’ll recap what we’ve learnt so far.